Monday, January 19, 2015

Sliding Barn Doors –An easy solution for limited space.


As we chug along with our Quest of putting our own stamp on someone else’s custom home, I found myself staring at the closet area every morning, trying to figure out a closet solution. What were the original owners thinking? Why would anyone want to walk through a messy closet to get to a tiny master bath with an over-sized roman tub? –Master bath fixed, now onto the closet area. Now I know what you’re thinking: Why would someone put so much effort in such a tiny area? The answer is, making any area look special and glamorous is just as important in small areas as it is in big areas. And once you see the before pictures you’ll understand why. Walking through that messy closet to get to a pretty bathroom was depressing.
Now I thought I had some before pictures of the wallpaper border that I needed to take down but I guess I started doing before photos after we painted and installed crown molding. You’ll have to use your imagination there. So here you are. The before pictures in all their glory…
The bi-fold door entrance from the Master Bedroom to the closet.


Look how bad this looks and look at this silly bi-fold door to hide the strange set-up.
Notice there is no door on the bathroom. You have to close the bi-fold door to get your privacy. We thought about putting in a pocket door to the bathroom but there is plumbing behind the wall. We thought about sliding mirror doors to hide the clothes, but it limits access to the clothes in the closet. There was a sconce light on the left wall that shares the bathroom that was dysfunctional so we pulled the wires up to the attic and secured them for future lighting, once we figure out what to do.
A trip to Ikea was in order to get a look at those sliding curtain panels. If we could find the right color then we think it will solve our “hiding the clothes” problem. I went with a friend and we found the perfect color. The panels are light and airy and flexible for getting to those hard to reach areas, plus the color blends perfectly with the new ceiling color. Problem Solved!


We love how clean this looks and the panels are
 flexible which allows us to easily access things in our closet.
And you get a peak at the pendant lights.
Adding the crown molding helped glam it up a bit more.

Now onto the lighting dilemma. –I really wanted a chandelier. Only problem was that attic access in the ceiling of the closet was framed out really solid. There is a lot of wood around that hole. That wood encroaches right in the center of where the chandelier would be. In fact, all the framework in the ceiling dictated where any lighting would go. That is when we decided to go with the pendant light look. –3 of them. Placing 3 lights in a triangle formation made the most sense and I still got a little bit of glam in that tiny little space. See pic above.
And again thank goodness for HGTV and DIY, along with a few other channels for inspiration. –Sliding Barn Doors! Yes. That was the answer to not having normal doors on the master bathroom and closet area. Plus no swinging door to encroach on the tiny space, and it added a little character and rustic charm. BTW Home Depot carries the Sliding Barn Door hardware. Scroll down to see the final results!
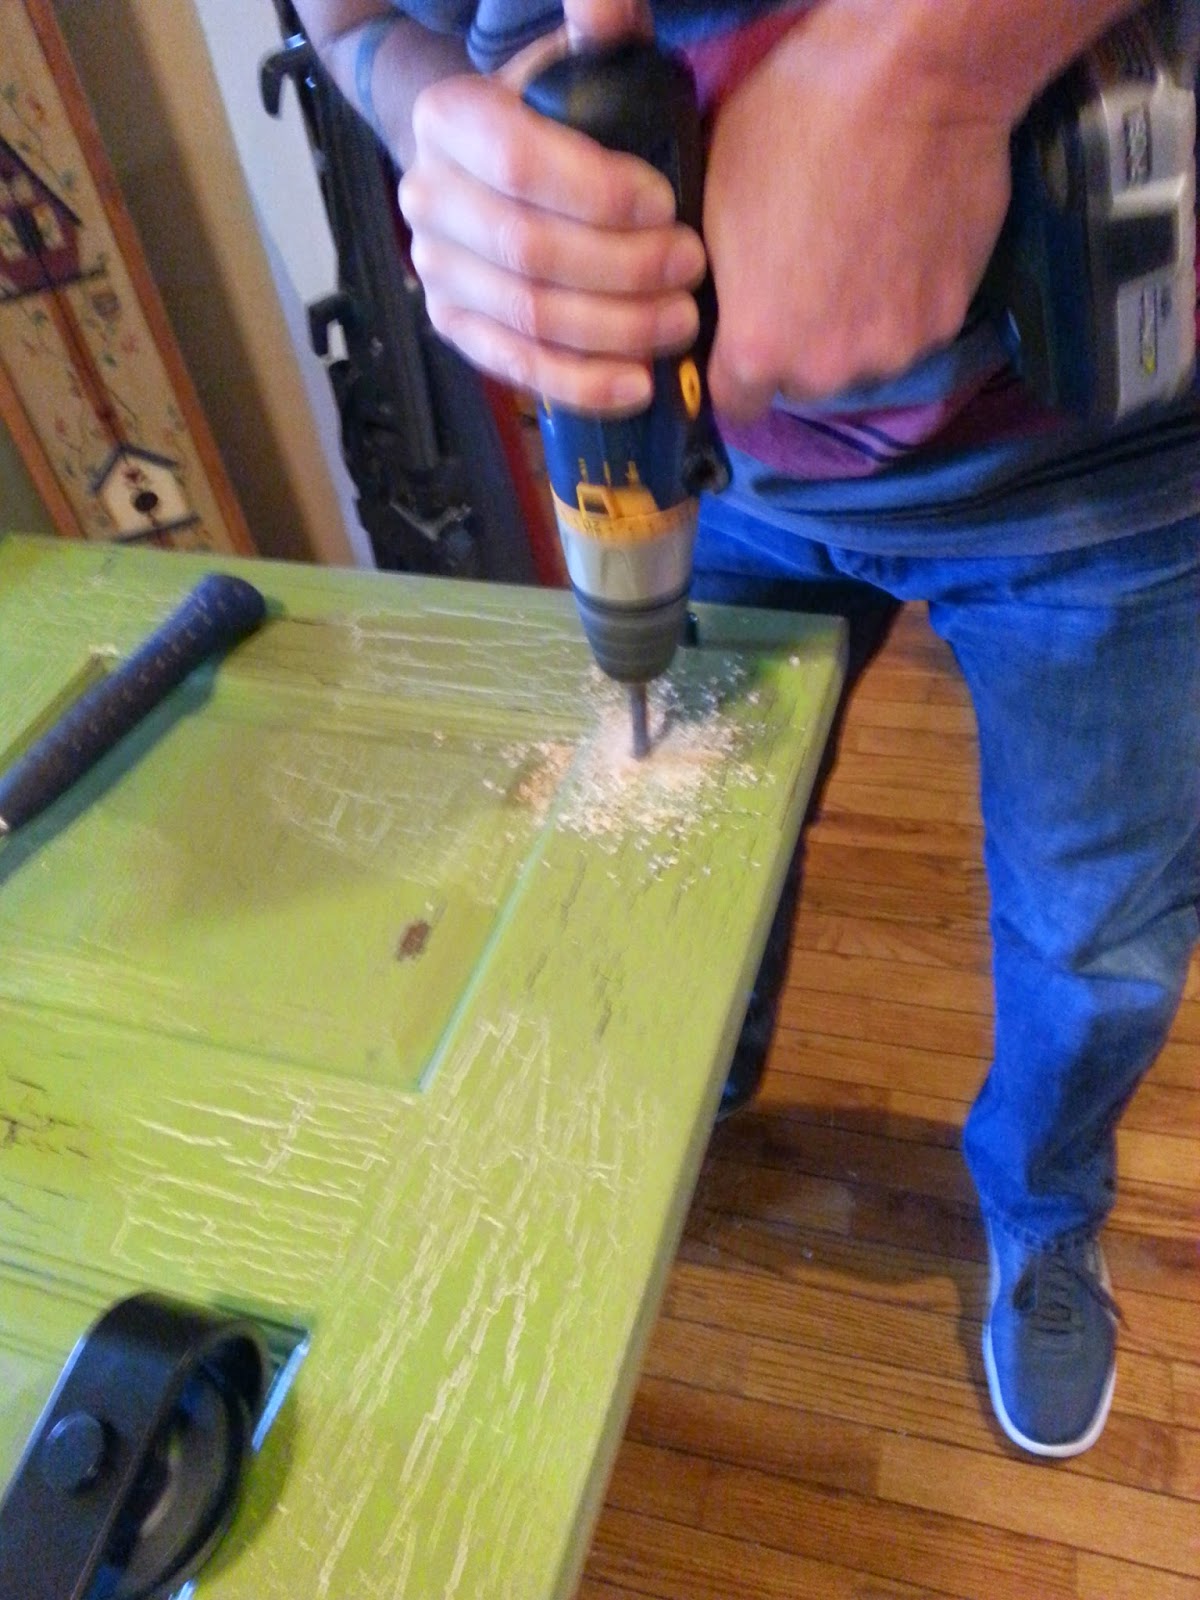
Now I started looking at antique doors with a great patina. There were just a few problems.—1- the sizes were wrong and 2- there use to be a doorknob where there is now a hole. –So much for privacy.
I am crafty. I have made new things look old before so we went to our local home improvement store and bought 2 doors and just as soon as our holiday company left, I got to work on them.

Here are the easy steps to achieving an old, rustic looking door. There are 9 steps in all for each side, plus 1 day, at least, for drying time before you flip the door to the other side or attempt to add the barn door hardware. So each door takes about 10 days for this method. Patience is a virtue in this process.

Step 1. Bring out your door torturing tools. Beat the door up.


Step 2. Sand to a nice finish. I used a 80 grit, then finished with one of those sponge sanders, 120 grit. Vacuum the excess dust then wipe clean with a damp cloth. I used the leaf blower for the door I started outside.
Step 3 Brush on a moderate layer of Gel Stain. I used Walnut color. I also used a cheaper stiff brush because I wanted to pull the excess off with the stiffness of the brush. When using this product there is no need to wipe it off. Always paint in the direction of the grain. Now just let it dry.


Step 4. Using your stiff, cheap brush, apply a thin, even coat of crackle medium. I started off with the bottle crackle medium which is thinner and easy to apply. Then I ran out and got this tub of crackle medium which is thicker. Solution: thin it out for easier application. Allow to dry.


Step 5. Apply your Giraffe spots. This might seem scary but I wanted different colors to show through the finished door. I used colors that were already common in our house. The spots will crackle, exposing the stain. Use a good quality brush on your color paints. –Dry.

Don't let this scare you.

Step 6. Apply Crackle Medium to ALL the Giraffe spots. –Dry.
Step 7. Paint your whole door the desired color for the finished look with a good quality brush. I used Hauser Light Green by Americana. Now be very careful and methodical about your strokes. Once it starts to crack, you don’t want to brush over it again. The previous colors will show through the finished paint. –Allow to dry to touch but still a bit soft…

You will see the cracks within 1 minute of each stroke.

Step 8. While the paint is still soft get a putty knife or a 5-in-one tool and scrape some of that new paint off. Little touches here and there. The corner of the door and raised molding areas are effective places to scrape off, as time would wear the paint this way.

A little blurry. I just left the soft loose paint on the door after
 scraping until it was totally dry. Made removing it much easier.

Step 9: Apply a clear satin, water based acrylic poly varathane finish to the door. –Let dry over a night or two and you’re ready to flip the door over and do the other side or if both sides are done, proceed with your sliding barn door hardware.


And now for the finished look. As you can see, we needed 2 sliding barn doors. I love the pop of color and that rustic look when you enter the room.


This is the second sliding barn door that goes from
 the master bedroom to close off the closet area.
Removal of the wallpaper and beefing up the crown molding
 is on the agenda but I am dreading it....


So there you have it. Boring, ugly closets don’t have to be boring or ugly.


Monday, November 3, 2014

The New Deck and Outdoor Kitchen


In 2005 we decided to take the big leap of faith by knocking down the rickety old backyard deck and put in a bigger and better one. This was a big undertaking. Most of the demolition was taken on by our son Daniel, who took pleasure in smashing up the old deck. He was almost 13 at the time and I was surprised at his strength and Randy was thrilled by his strength. He now had a son who could help with heavy lifting.

The old deck was in bad shape. Apparently there were potted plants place on it without the deck actually being treated. It was rotting, splintered and you never dared to lean on the rail or you may go over the deck. Plus it was tiny, almost as if it were an afterthought. –Let’s just throw up a deck, without considering the function. This needed to change. We needed to expand it beyond the bay window, and under the kitchen, let’s pour a slab of concrete and put in a spa. This should flatten the entertaining space and make the yard much more functional. Only I didn’t want any more hand rails. That to me was something that would require upkeep. –Painting! Instead let’s put in cabinets and a counter top to span where the railing would go. Yes. Randy has agreed.

Do you see how short the deck is? Under the bay window is a big hole.


We bought composite decking at Lowes and had them deliver all the necessary materials to our home. Now this is where I wish I had taken more pictures. I cannot seem to find any. If I come across some later I will insert them. But here are the results.


We had some left over counter top and we stared at it for a few years trying to figure out what to do with it. When Randy was turning 50 I wanted to have a big party for him so I decided we needed to make a Kitchen Island out of the leftover piece of granite. We went to Ikea and purchased a stainless steel kitchen island without a top. Our granite fit perfectly.


You can see the kitchen island here. This is actually for McKenna's 3rd Birthday party. We used it for extra seating.

We also purchased an automatic remote controlled Sunsetter awning for above the deck for those hot sunny days. It’s nice to be able to retract it on cooler days when your want to feel the warmth of the sun.

We added an extra portable awning for this party with another table and some more seating. You can also see where we placed the spa at the bottom of the picture. It sits lower than the deck for easy access.
Papa is helping McKenna with her ballet leg. She wants to be an Auburn Mermaid just like her mommy.
This kitchen is perfect for big get-togethers. There is so much counter space and the grill has 2 burners and an oven. Later we purchased a smoke vault for smoking large quantities of meat to add to our outdoor kitchen. Slowly we have added some furniture and made it an extension of our home.


It also has drastically changed the view from the inside of our house, especially the bay window, where before the deck stopped short of the bay window and you looked down at a giant hole.

Saturday, June 7, 2014

Sunflowers Everywhere! –an epidemic of the good kind.


Last year I planted Sunflowers in my garden so that the birds would be attracted to the seeds, rather than the cherries on the trees. It worked a bit, however buying mylar balloons and tying them onto the branches works just as well, if not better. -The bright, shiny wavy, reflective balloons scare them away from the Cherry trees. Uh-oh I am just a few sentences into my blog and I am already digressing! The sunflowers were beautiful and the birds were very happy.


Birds are very smart creatures. They don’t eat every seed that they pick from the flower. They bury the seeds as well. This ensures they will have something to eat next spring-fall, and when you live in California, something for the birds to eat throughout the year. My neighbor informed me last year that she had Sunflowers in her back yard and she did not plant them. Then I saw some pop up in parts of my yard where I know I didn’t plant any.

One of the Many Sunflowers that are Popping Randomly


I have this super steep hill that doesn’t like to grow anything, except weeds! This year as I was making my weed rounds around the yard I noticed a grove of sunflowers sprouting up on that stubborn hill. Amazing. If I want to have anything grow on that hill, I guess I will just have to ask the birds to plant them. They have the magic touch.

A Small Grove of Sunflowers Planted by the Birds
This stately Sunflower stands over 8 feet tall and is just beginning to bud.
I call it the Ambassador to my garden.

I expect by next year Sunflowers will be filling this entire neighborhood. That’s not a bad thing at all.

~Susie

Saturday, January 4, 2014

Even the Motor Home Gets a Facelift


It may not be luxurious but we have wonderful memories created. 

So we just get done with all the hard work of residing and painting our house when Sister-in-Law Christy comes for a visit. There’s always trouble when she visits, but in a good way. When she comes we usually end up at our favorite fabric store and this time they had 60 percent off many of the fabrics!!. This is a good mission because the curtains in the motor home are getting crispy, cracking and fading from the sun. 

Look closely at the small rips along the bottom.

I figured I could go and look for something from that era (1999) and not spend a lot of money. -Not so fast! We get there and I am focused on my mission of finding a print that coordinates with the rest of the motor home which is Rose, Eggplant, green and various shades of beige and tan. I was trying to be good, but they had new arrivals of some beautiful outdoor fabrics and I just kept gravitating toward all those pretty patterns. After all they were outdoor fabrics so really they would be very durable and fade resistant and stain resistant and easy to clean….. –I was singing the praises of quality outdoor fabric in  my head.


I mean can ya blame a girl for getting excited about all these choices?

I called Randy and asked pretty please can we redo all the fabrics in the motor home?. Being the awesome man that he is, he didn't deny me, and had faith that we could make it look really great.
I decided on a black and white theme with 3 different patterns, a houndstooth, a modern retro take of mid century and a large flower print reminiscent of a Hawaiian pattern. -Small pops of red would finish it off.

The bottom three in this picture are the 3 fabrics we decided on

.

The trick is, I have never reupholstered a chair in my life nor have I made big cushions that make up the upper bunk mattress. We bit the bullet and paid to have those done. We decided on the modern fabric with the houndstooth for the skirt on the chair, then I made a pretty houndstooth pillow and embellished it with a blingy button. For the upper bunk cushions, we decided that the large flower print would look good.


Before.....


After! Notice the pillow I made?
And now to the Upper Bunk...


Before.....


After! I love the large print complimented by the houndstooth curtains.

Meanwhile I got to work taking down the crispy curtains, the dusty metal blinds and the nasty, full of dust coming apart at the seams padded valances, along with the worn out dinette cushions. I counted 8 windows that needed new roman shades and valances. –I got this!
I shopped for all the supplies needed and got to work first on the curtains that wrapped around the upper bunk in the houndstooth. –Holy smokes this was a lot of work and I was beginning to re-think why I started it in the first place, but I kept drudging on.


This wrapped around the upper bunk on 3 sides.

Now onto the Roman Shades. I have done Roman Shades before so I knew I could do this but I had to do 5 windows in all. It took days, but it looked fantastic when done, plus no more noisy metal blinds when driving. -That's a plus.


I chose to make the valance and the Roman shade the same pattern to mimic a padded headboard. When the Roman shade is up, you get a beautiful view of your surroundings.


 Randy helped me with the padded valances because it required 2 people to staple them down nice and even.


These are the padded valances. I pulled them apart and removed the staples and used the old fabric for the pattern for the new valances.

Now onto the dinette cushions. I managed them just fine.

It's kind of blurry but I wanted to show the valance with the dinette cushions.
The dinette coordinates with the little chair, while the valance ties together with the upper bunk cushions. The gray rug helps with dirty feet upon entering.

I found this picture of the Napa Wine Train and just had to have it. Our motorhome practically knows its way to Napa/Sonoma.


Whenever I was at a store I always kept in mind that we need new bedding to match. I managed to get the bedding for 40 dollars. I love a good bargain. 

I can't believe how well this bargain bedding goes with the rest of the decor!


Two more sets of Roman shades and valances finish off the room.
I took this picture at the beach and just had to frame it for the bedroom.


I love the new look! And many people are surprised to see how nice it looks considering its age.
Thanks for looking at my blog!
Susie